

SAIT: Blog2 - React
Outline
The purpose of this posting is to create a React project and take a look at what features React have. Beside, I’m going to upload the video for demonstration of using React which helps readers understand React.
What projects am I going to demonstrate in React?
I’m going to make a project to demonstrate React functions and try to focus on basic function to be familiar with React.
- Fruit basket (UseState) This is the project using useState and functional components, and the basic concept for this project is displaying what kinds of fruit and how many fruits in each basket in the data file which consists of array. If the fruits increased more and more, the fruits will be displayed on the form. For this function, useState will be using for implementation.
The name of the project: Fruit basket
I’m going to demonstrate how we can use React function with my simple project. It’s quite the simple application, but it has the basic function we have to know about React, so
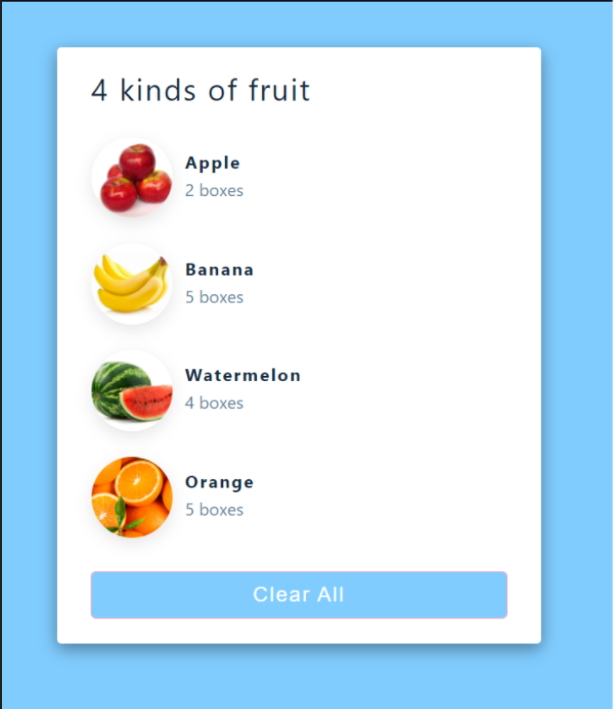
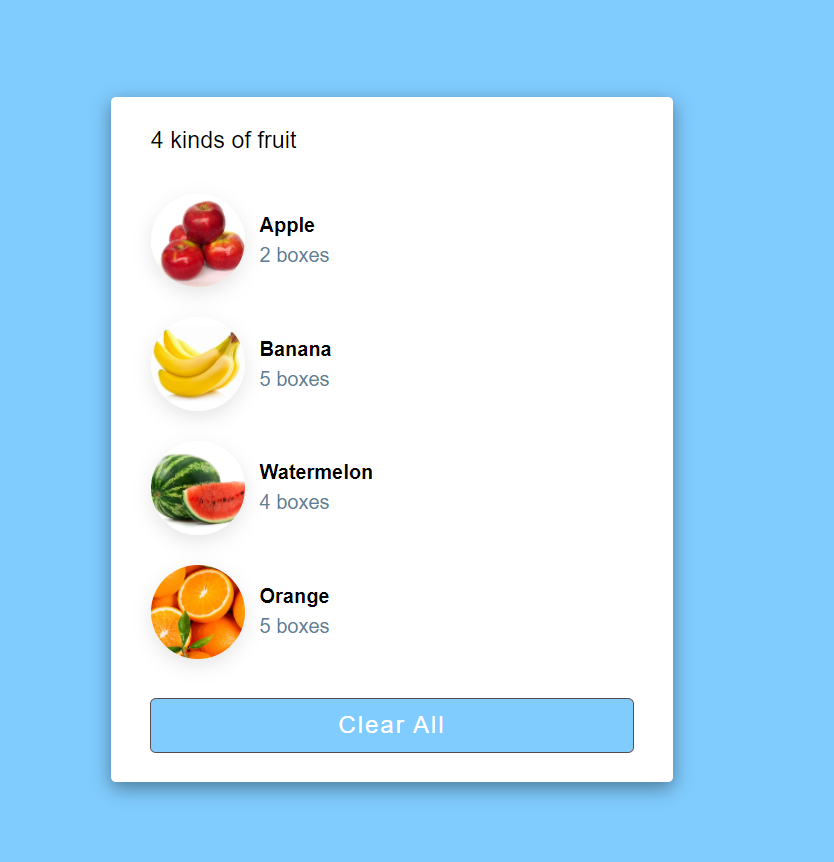
This is the screenshot of complete application. Let’s make it together.
First step for this project is create the application using create-react-app command.
I’m going to create a react application named react-fruit-basket. If you don’t know how to do it, you’d probably better go back to blog 1 I posted a month ago and try to make hello-react application.

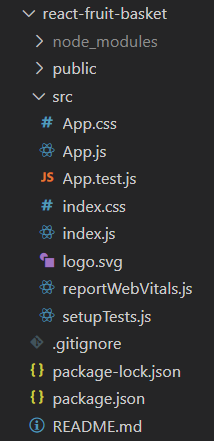
This is the folder structure that you can find a new application that you just make.
Here is a full code of index.js
import React from 'react';
import ReactDOM from 'react-dom';
import './index.css';
import App from './App';
import reportWebVitals from './reportWebVitals';

ReactDOM.render(
  <React.StrictMode>
    <App />
  </React.StrictMode>,
  document.getElementById('root')
);

// If you want to start measuring performance in your app, pass a function
// to log results (for example: reportWebVitals(console.log))
// or send to an analytics endpoint. Learn more: https://bit.ly/CRA-vitals
reportWebVitals();
What you need to know is js <App /> is the place for writing code.
When you write a code in App.js, React render your code and show your app on the screen.
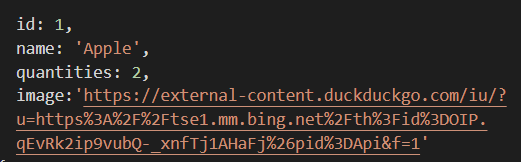
Here is a full code of data.js
export default[
    {
        id: 1,
        name: 'Apple',
        quantities: 2,
        image:'https://external-content.duckduckgo.com/iu/?u=https%3A%2F%2Ftse1.mm.bing.net%2Fth%3Fid%3DOIP.qEvRk2ip9vubQ-_xnfTj1AHaFj%26pid%3DApi&f=1'
    },{
        id:2,
        name: 'Banana',
        quantities: 5,
        image:'https://external-content.duckduckgo.com/iu/?u=https%3A%2F%2Fwww.dayfreshkuwait.com%2Fpub%2Fmedia%2Fcatalog%2Fproduct%2Fcache%2F857e541ec9f008db3ccadf7b2010b71e%2Fb%2Fa%2Fbanana-philippines1.jpg&f=1&nofb=1'
    },{
        id:3,
        name:'Watermelon',
        quantities: 4,
        image:'https://external-content.duckduckgo.com/iu/?u=https%3A%2F%2Ftse1.mm.bing.net%2Fth%3Fid%3DOIP.oU8AIoRAZj9CeoL_qeaVcwHaFS%26pid%3DApi&f=1'
    },{
        id:4,
        name:'Orange',
        quantities: 5,
        image:'https://external-content.duckduckgo.com/iu/?u=https%3A%2F%2Fmealstudio.com%2Fwp-content%2Fuploads%2F2019%2F10%2FOrange-1.jpg&f=1&nofb=1'
    }

]
This is data that we can call each item to App.js or List.js. You can notice that it looks like array.
Here is a full code of App.js
import React, { useState } from 'react';
import './App.css';
import List from './List.js';
import data from './data.js';

function App() {
    const [fruits, setFruits] = useState(data);

    return <main>
        <section className='container'>
            <h3>{fruits.length} kinds of fruit</h3>
            <List fruits={fruits} />
            <button onClick={() => setFruits([])}>Clear all</button>
        </section>
    </main>
}

export default App;
import React, { useState } from 'react';
The above code is on the top of the app.js which means it calls a useState function from a react package. The useState is also kind of hook which makes it possible to take a React function component and add state to it. We can use this way to import some components from somewhere else.
import './App.css';
import List from './List.js';
import data from './data.js';
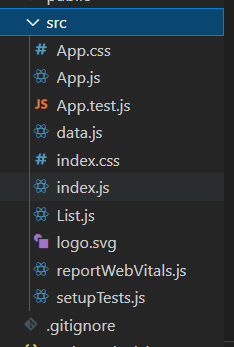
We can add List, data components and CSS to App.js, so make List and data in src folder.
const [fruits, setFruits] = useState(data);
We can initialize a state by calling useState. useState accepts an initial state and returns two values which are a current state and a function that updates the state. [fruits, setFruits] The frist value fruits is the current value, and the second value setFruits is the function that updates the state. We set the initial state to the data arrays from data.js which importing at the top.
<h3>{fruits.length} kinds of fruit</h3>
We can notice fruits is array, so it can use length method to show length of fruits array by writing {fruits.length}.
<List fruits={fruits} />
Now, we can use List and data in App.js. For example, if I want to use List component, I can use it by writing <List /> like tag name in return parentheses. fruits is fruits array from data imported at the top of the App.js. The all data of fruits will be passed through the attribute of List component.
Now, we send data to List component, so let’s use the fruits data in List.js.
<button onClick={() => setFruits([])}>Clear all</button>
This is the button for clearing all items on the table, so you can see the setFruits([]) which means making fruits array empty, and this is using useState. We can update our state using like this, and this is like setter method in Java.
Here is a full code of List.js
import React from 'react'

const List = ({fruits}) => {
  return (
    <>
    {fruits.map((fruit)=>{
        const {id,name,quantities,image} = fruit;
        return <article key={id} className="fruit">
        <img src={image} alt={name}   />
        <div>
            <h4>{name}</h4>
            <p>{quantities} boxes</p>
        </div>
        </article>
    })}
    </>
  );
};

export default List;
Do you remember there was the array contains fruits from data.js <List fruits={fruits} />. We can use each element of the array in the functional component. First line is const List = ({fruits}) => { .... In this way, we can use the array named fruits in the child component.
Notice that fruits used for mapping each element at {fruits.map((fruit)=>{ Each element in fruits can be used in child component with a variable fruit in parameter.
Now, const {id,name,quantities,image} = fruit; fruit element has four attributes id, name, quantities and image. These variable name is in data.js.
return <article key={id} className="fruit">
        <img src={image} alt={name}   />
        <div>
            <h4>{name}</h4>
            <p>{quantities} boxes</p>
        </div>
        </article>
Notice that each element’s variable places in a tag as a id and name using curly bracket { }. This will be a component for displaying on the table in App.js. If there is lots of data in data.js, we can use ````` as much as we can in App.js.
This is how React works. Make component for each element and reuse it whenever I want here and there.
Now, we are going to be setting CSS for our application.
Here is a full code of index.css
* {
  margin: 0;
  padding: 0;
  box-sizing: border-box;
}
body {
  font-family: sans-serif;
  background: #80ccff;
}

p {
  margin-bottom: 1.25rem;
  color: hsl(210, 22%, 49%);
}


/* section */
.section {
  width: 90vw;
  margin: 0 auto;
  max-width: 1170px;
}

main {
  min-height: 100vh;
  display: flex;
  justify-content: center;
  align-items: center;
}

.container {
  width: 90vw;
  margin: 5rem 0;
  max-width: 450px;
  background: #fff;
  border-radius: 0.25rem;
  padding: 1.5rem 2rem;
  box-shadow: 0 5px 15px rgba(0, 0, 0, 0.4);
}
.container h3 {
  font-weight: normal;
  text-transform: none;
  margin-bottom: 2rem;
}
.fruit {
  display: grid;
  grid-template-columns: auto 1fr;
  column-gap: 0.75rem;
  margin-bottom: 1.5rem;
  align-items: center;
}
.fruit img {
  width: 75px;
  height: 75px;
  object-fit: cover;
  border-radius: 50%;
  box-shadow: 0 5px 15px rgba(0, 0, 0, 0.1);
}
.fruit h4 {
  margin-bottom: 0.35rem;
}
.fruit p {
  margin-bottom: 0;
}
.container button {
  color: #fff;
  display: block;
  width: 100%;
  border-color: transparent;
  background: #80ccff;
  margin: 2rem auto 0 auto;
  text-transform: capitalize;
  font-size: 1.2rem;
  padding: 0.5rem 0;
  letter-spacing: 0.1rem;
  border-radius: 0.25rem;
  outline: 1px solid rgba(44, 30, 35, 0.8);
  cursor: pointer;
}
Implementing CSS is much similar with the way you have done before in your web project. . indicates class name. Notice that you have to use className as a class name, not class like in web project you have taken so far like this <article key={id} className="fruit">
Now, Let’s look at our web application how it looks like.
Tada, you have done making a react project.

Leave a comment